| |
Licence |
All tools on this page work under Windows 2000 and higher. They are Freeware.
Allowed:
- usage in any environment, including commercial
- include in software products, including commercial
- include on CD/DVD of computer magazines
Not allowed:
- modify any of the files
- offer for download by means of a "downloader" software
|
|
| |
|
| |
RemoveDrive V2.3.3 - Safe removal of drives |
RemoveDrive prepares drives for "Safe Removal" by commandline. It works with drives only but not for other device types.
RemoveDrive DriveSpec: [-l][-h][-b][-i][-s][-w:nnnn]

DriveSpec  is the drive to remove, e.g. U: or an NTFS mountpoint as "C:\CardReader\Multi Reader SD"
           or . for the current drive
           or \ for the drive of the RemoveDrive.exe
           or a volume name like \\?\Volume{433619ed-c6ea-11d9-a3b2-806d6172696f}
           or a kernel name like \Device\HarddiskVolume2 (Volume)
           or a kernel name like \Device\Harddisk2\DR0 (Disk)
           or a partition name like \Device\Harddisk2\Partition1
           or a device ID
           or a friendly name like 'Corsair Voyager'
           Wildcards can be used.
[-L]       loop until success
[-e]       try to dismount and eject if the removal fails
[-h]       show open handles (admin rights required, exprimental, may freeze!)
[-h:X]     show open handles on a different drive (e.g. a TrueCrypt volume whose container is on the drive to remove)
[-w:nnnn]  wait nnnn milliseconds before closing the console window
[-s]       self delete removedrive.exe
[-b]       let Windows show the "Safe To Remove Hardware" balloon tip
[-i]       stop Windows indexing service (CiSvc) for a moment if required (admins)
[-d]       show debug information
RemoveDrive can be used with all types of drives. Started with -L it tries to remove the drive in an endless loop until success or until canceled.
As result it shows 'success' in green or 'failed' in red.
Sample:
removedrive u: -L
would try to prepare drive U: for safe removal in an endless loop until success.
For drives mounted into NTFS folders the full path of the folder can be used:
removedrive "E:\_CardReader\USB20 CF" -L
Used with multislot-cardreaders it would remove the whole reader, regardless of the given slot. For removing a card only, use my EjectMedia tool, see below.
Instead the drive letter one of the drive's device ID strings can be used. The friendly name can be used as "Corsair Flash Voyager" or the hardware ID of the drive, like USB\VID_1234&PID_5678...
Wildcards can be used here. E.g. RemoveDrive *Flash* to remove the first drive with 'Flash' in its device name.
RemoveDrive can be started from the drive to remove. Because a running EXE on a drive prevents a drive being prepared for safe removal it creates a temporary, self deleing copy and starts it with the same parameters. The returned errorlevel is 4 then. To be drive letter independent, use . instead a drive letter. The current drive is removed then. To remove the drive of the RemoveDrive.exe use \ as drive.
If the removal fails then someone still accesses the drive. This can be something obvious like an open Word document or a mounted TrueCrypt container or some kind of monitoring tool like a virus scanner. A network share on the drive that has been used makes the removal fail too...
By means of SysInternals
ProcessExplorer you might be able to discover which program holds an open handle to the drive. After starting it go to 'Find' -> 'Find Handle or DLL', enter the drive letter like X:\ or a part of the kernel-name like 'Harddisk3' and search. You get the kernel-name by means of my
ListUsbDrives or
ListDosDevices.
Download: removedrive.zip
Last update: 21 June 2012
For programmers I've made a demo project which shows the essentials:
How to prepare a USB drive for safe removal
A free alternative to the Windows tray icon is "HotSwap":
http://mt-naka.com/hotswap/index_enu.htm
|
|
| |
|
| |
RestartSrDev - restarts "Safely Removed" devices which have the "Code 21" problem code |
Usage:
RestartSrDev DeviceId [-t][-w:nnnn]

DeviceId: is the device's device instance ID, it can include wildcards
[-t]      test only
[-w:nnnn] wait nnnn milliseconds before closing the console window
[-d]      debug info (show all devices)
Samples:

RestartSrDev *

RestartSrDev USB\VID_0781*PID_5406*

RestartSrDev "USB\VID_0781&PID_5406\0000051017037750"
If the & char is used in a parameter then the whole parameter must be enclosed by quotation marks. Otherwise the & char splits the command line into two which will not work.
Admin rights are required.
Returns Errorlevels:
0 - successfully restarted at least one device
1 - no device restarted
2 - other problem
Background information
After using the Windows "Safely Remove Hardware" facility,
a device gets the
problem code 47, which is a constant
from the cfg.h:
CM_PROB_HELD_FOR_EJECT.
As far as known, a device with this problem code cannot be
reactivated. The only way for a USB device is to restart
the hub which this device is connected to. This can be a
root hub or a usual hub. But of course this will restart all
devices attached to this hub.
But sometimes devices have problem code 21 after the
safe removal, which is
CM_PROB_WILL_BE_REMOVED.
Devices with this problem code can be reactivated by restarting them. This can be done by means of the Microsoft DEVCON tool (DEVCON restart DeviceInstanceID). My tool restarts only devices with the problem code 21, so usually you can just start it with a asterisk as paramerter to restart all devices with code 21.
It seems that it depends on the API call which is used to perform the safe removal. There are two:
CM_Query_And_Remove_SubTree and CM_Request_Device_Eject.
CM_Query_And_Remove_SubTree leads to "Code 21" while CM_Request_Device_Eject leads to "Code 47".
Obviousely the removal is not complete with Code 21, but since drive and volume are gone then it should be "safe" enough.
CM_Query_And_Remove_SubTree requires admin previleges while CM_Request_Device_Eject works for restricted users
too.
The Windows Safe Removal leads to Code 47, so probably it uses CM_Request_Device_Eject.
My tool RemoveDrive tries CM_Query_And_Remove_SubTree
first and if this fails then it tries CM_Request_Device_Eject.
So, if you have admin previleges and removing a drive by
means of RemoveDrive, then it is possible to reactivate
the drive by means of RestartSrDev.
Download: restartsrdev.zip
Last update: 03 Aug 2011
|
|
| |
|
| |
EjectMedia V2.2 - ejects a media from a drive |
It ejects a media from a drive rather that removing the whole device by commandline. Ejecting the media only is especially suitable for internal cardreaders.
On CD/DVD and ZIP drives the media is physically ejected while on flash cardreaders the media is ejected logically only. It cannot being accessed before it's removed and inserted again.
Windows passes the eject request down to the drive even it is a fixed drive. Most fixed drives answer "invalid function" but some respond success.
Under XP this is not allowed for restricted users but this can be enabled by a policy.
EjectMedia DriveSpec [-L][-d][-f][-h][-w:nnnn]


DriveSpec  is the drive whose media to eject, e.g. U: or an NTFS mountpoint as "C:\CardReader\Multi Reader SD"
           or . for the current drive
           or \ for the drive of the EjectMedia.exe
           or a volume name like \\?\Volume{433619ed-c6ea-11d9-a3b2-806d6172696f}
[-L]       loop until success
[-d]       dismount only (do not eject)
[-f]       force dismount or eject
[-h]       show open handles (admin rights required, exprimental, may freeze!)
[-w:nnnn]  wait nnnn milliseconds before closing the console window
As RemoveDrive, EjectMedia can be started from the drive to remove.
Download: ejectmedia.zip
Last update: 03 Aug 2011
For programmers I've made a demo project which shows the essentials:
How to flush a storage volume's file cache, lock and dismount it, and eject the media
|
|
| |
|
| |
LoadMedia - loads a media |
LoadMedia is the counterpart of EjectMedia. But it has an effect only on CD/DVD drives. ZIP drives have no mechanic for loading a media and and an ejected card of a cardreader is not reactivated even Windows reports success here.
LoadMedia drive [-d][-f][-w:nnnn]

DriveSpec  is the drive whose media to load, e.g. U: or an NTFS mountpoint as "C:\CD-Drives\Burner1"
           or . for the current drive
           or \ for the drive of the LoadMedia.exe
           or a volume name like \\?\Volume{433619ed-c6ea-11d9-a3b2-806d6172696f}
[-f]       force load
[-w:nnnn]  wait nnnn milliseconds before close
Download: loadmedia.zip
Last update: 16 May 2010
|
|
| |
|
| |
EjectTcv V0.1 - 'ejects' a TrueCrypt Volume |
EjectTcv (EjectTrueCryptVolume) ist ein Kommandozeilen a commandline tool which 'ejects' a TrueCrypt volume.
Advantages over original TrueCrypt tool:
- identify the TrueCrypt volume by its container
- can loop until success
- can show open handles (exprimental, may freeze!)
I used the term 'eject' because 'dismount' as used by the original tool means only to disconnect the file system but keeping the volume present.
EjectTcv DriveSpec [-L][-f][-h][-w:nnnn]

DriveSpec is something that defines the TrueCrpyt Volume to eject,
e.g. T: (the TrueCrypt volume's drive spec)
or its VolumeName like Volume{GUID}
or the path of its container, e.g. a partition name or a file name
[-l] loop until success
[-f] force
[-h] show open handles (exprimental, may freeze!)
[-w:nnnn] wait nnnn milliseconds before close
It can be started from the volume to eject, it creates a temporary copy then.
Samples:
EjectTcv T:
EjectTcv T: -L -h
EjectTcv \Device\Harddisk1\Partition1
EjectTcv C:\secret.tc
Returns errorlevels:
0 - success
1 - success by force
2 - TC volume gone while trying
3 - TC volume not removed
4 - 2nd instance started
5 - invalid params
Download: ejecttcv.zip
Last update: 22 Aug 2013
|
|
| |
|
| |
ReMount - reassigning mounpoints (change drive letters) |
Using ReMount you can quickly change a drive letter without clicking thru the Windows disk management. E.g. to change drive F: to U:
remount f: u:
If both letters are in use and shall be swapped then use parameter -s
remount f: u: -s
For nonsense operations, as remonting the Windows system drive or mounting a local drive to a letter used by a network drive, use parameter -f (force). Furthermore -f can be used to remount a drive to a drive letter which is in use. The drive which uses the target letter is remounted to the first free letter.
remount c: x: -f
Instead of drive letters you can use NTFS mount points too.
Admin privileges are required.
Download: remount.zip
Last update: 13 March 2011
|
|
| |
|
| |
FFB - Flush File Buffers |
FFB is a commandline tool which flushes
the write cache of one or more storage volumes. It is similar
to the Unix sync command or the
Sysinternals Sync tool.
The name comes from the Win32 API call FlushFileBuffers:
http://msdn.microsoft.com/en-us/library/windows/desktop/aa364439(v=vs.85).aspx
The Sysinternals sync tool can flush volumes only which have
a drive letter. And it forgets drive Z: when called without
parameters.
Usage:

FFB [VolumeSpec1] [VolumeSpec2] ... [VolumeSpecN] [-d] [-f]

VolumeSpec can be a drive letter, a drive or any kind of mountpoint
-d  dismount the volume(s) if possible
-f  force dismount (open handles become invalid)

Samples:

FFB C
FFB C D E
FFB C: D: E:
FFB C:\ D:\ E:\
FFB C:\CardReader\SD
FFB \\?\Volume{16b5dd59-158f-11e1-b349-00166f0dc865}
FFB \\?\Volume{16b5dd59-158f-11e1-b349-00166f0dc865}\
Flushing a volume's cache requires admin previleges, so, restricted users cannot flush.
To overcome this limitation I have given the "USB Drive Letter Manager (USBDLM)" V4.7.3 a command interface which FFB can use for flushing the file cache.
See USBDLM help in section "Settings" for details.
Download: FFB.zip
Last update: 21 April 2013
|
|
| |
|
| |
DriveCleanup - remove nonpresent drives from the registry |
DriveCleanup removes all currently non present "Storage Volumes", "Disk", "CDROM", "Floppy" USB drives and their USB devices from the device tree. Furthermore it removes orphaned registry items related to these device types. Since V0.8 it removes WPD devices under Vista and Win7.
Started with parameter -T (like test) it shows which devices it would remove.
DriveCleanup -T
Started without a parameter, it does its job without further inquiry.
To remove certain types of devices there are the parameters -U -D -C -F -V -W and -R.
Sample to remove abandoned registry entries only:
drivecleanup -R
Under x64 editions of Windows only the included x64 version works correctly, with the Win32 version you will see "severity error 0x235", which is ERROR_IN_WOW64.
Admin privileges required.
Download V0.8.1 (Bugfix for Win8):
drivecleanup.zip
Download V0.8.0 (WPDs):
drivecleanup080.zip
Download V0.7 (without WPDs):
drivecleanup07.zip
Download V0.4 (without registry cleaning):
drivecleanup04.zip
Last update: 22 Sept 2011
A related tool is DeviceCleanup.
|
|
| |
|
| |
ListDosDevices |
Drive letters are references to kernel objects thru 'symbolic links'. For historical reasons they are sometimes called 'DOS device names'.
ListDosDevices shows which kernel-name is behind each drive letter.
Sample:
A:  REMOVABLE  \Device\Floppy0
B:  ----
C:  FIXED      \Device\HarddiskVolume1
D:  FIXED      \Device\HarddiskVolume2
E:  CDROM      \Device\CdRom0
F:  CDROM      \Device\CdRom1
G:  ----
H:  ----
I:  CDROM      \Device\IsoCdRom0
J:  ----
K:  ----
L:  ----
M:  ----
N:  ----
O:  ----
P:  REMOTE     \Device\LanmanRedirector\;P:0000000000013548\server01\public
Q:  REMOTE     \Device\NetWareRedirector\WFS1\SERVER02\PUBLIC
R:  ----
S:  FIXED      \??\C:\Dokuments and Settings\Uwe\Application Data
T:  ----
U:  REMOVABLE  \Device\Harddisk5\DP(1)0-0+19
V:  ----
W:  ----
X:  CDROM      \Device\WMDisk0
Y:  FIXED      \Device\TrueCryptVolumeY
Z:  ----
Here are
A: Floppy
C: + D: partitions of a fixed drive
E: + F: CD or DVD drives
I: Virtual CDROM created by UltraISO
P: Windows Network drive
Q: Novel Network drive
S: Subst drive
U: USB flash drive (Win2000, XP, 2003; Since Vista the kernel-name looks like a partition.)
X: Virtual drive created by WinMount
Y: TrueCrypt drive
Download: listdosdevices.zip
|
|
| |
|
| |
DeleteDosDevice |
When a software crashes which had created virtual drives under a drive letter, then it leaves a dead drive letter behind.
Started again the software in question might be able to fix this but somtimes it just sees a drive letter in use.
In such cases you can try to remove the dead drive letter by means of DeleteDosDevice.
Sometimes the tool reports success because Windows sayed so, but the drive drive letter persists :-(
Sample for removing X:
deletedosdevice x:
Since V0.4 in can delete any type of DOS-device, e.g. a serial port as "COM10".
Download V0.4: deletedosdevice.zip
Last update: 19 Feb 2012
|
|
| |
|
| |
RescanDevices |
When an IDE or SATA drive has been prepared for safe removal it can be reactivated by a scan for new hardware.
That's what this tool initiates.
It is a non interactive, invisible Windows application. It does the same as Microsoft's tool DEVCON when called with parameter 'rescan', but no console window pops up.
Download: rescandevices.zip
|
|
| |
|
| |
XP SystemRestore Enable/Disable |
Enabling or Disabling XP SystemRestore for one or more drives.
Sample: Disable SystemRestore on drive D:
srd d:
Sample: Disable SystemRestore on drives D: to Z:
srd d-z
SRE enables the XP SystemRestore on certain drives.
If the SystemRestore is enabled or disabled for the system drive then this is done of all other local drives too!
This tool is for XP only. W2K has no system restore and since Vista the SystemRestore deals with the system drive only.
Download: systemrestore.zip
|
|
| |
|
| |
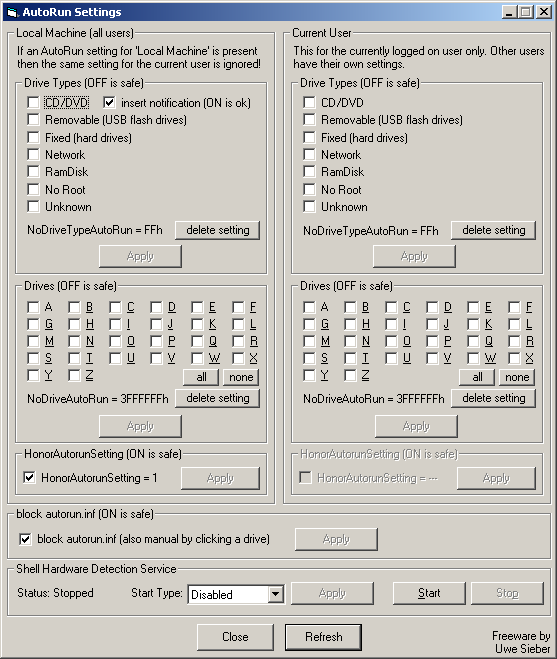
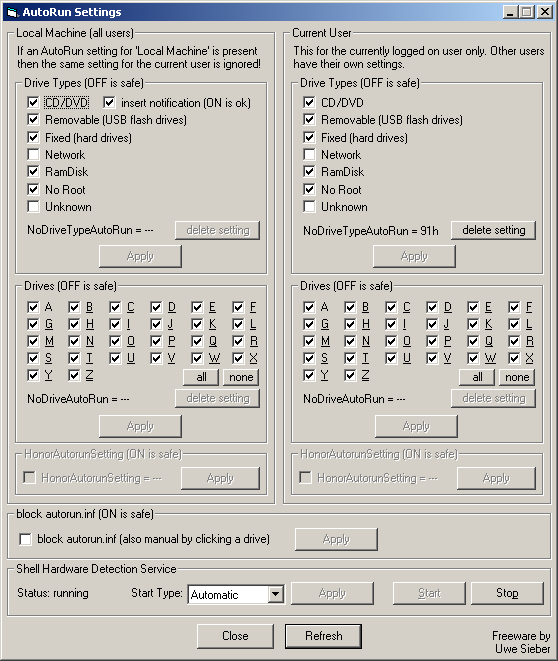
AutoRun Settings V1.3 |
AutoRunSettings gives easy access to the basic Windows AutoRun settings.
AutoRun can be disabled depending on the drive type and depending on the drive letter
by Explorer Policies.
These values are
- NoDriveAutoRun
and
- NoDriveTypeAutoRun
under
SOFTWARE\Microsoft\Windows\CurrentVersion\Policies\Explorer
See here:
NoDriveAutoRun
http://www.microsoft.com/technet/prodtechnol/windows2000serv/reskit/regentry/58886.mspx
By default (the value doesn't exist) AutoRun is enabled for all drive letters.
NoDriveTypeAutoRun
http://www.microsoft.com/technet/prodtechnol/windows2000serv/reskit/regentry/93502.mspx
They are valid under HKEY_LOCAL_MACHINE and under HKEY_CURRENT_USER. If a value exist
under HKEY_LOCAL_MACHINE then the same value under HKEY_CURRENT_USER is ignored.
Microsoft TweakUI sets the values under HKEY_CURRENT_USER only and completely ignores
HKEY_LOCAL_MACHINE. Furthermore TweakUI cannot make settings for hard drives and it
enables AutoRun for network drives by completly ignoring the default values.
For AutoRun and AutoPlay to work the service "Shell Hardware Detection" (ShellHWDetection) is required. If AutoRun is deactivated by the above settings then keeping this service running is in vain under XP unless autoruns for non drive devices are required. Under Vista and Windows 7/8 the WIA service relies on it.
These settings have effect only for the moment when a drive is attached. They do not deactivate AutoRun when the drive is opened manually in the Windows Explorer. This is changend with the Microsoft XP Patch KB950582, availlable since August 2008, see here:
http://support.microsoft.com/kb/953252
Since end of February 2009 it is automatically distrbuted as KB967715...
An alternative is to completely disable the autorun.inf mechanisms as
suggested by the US-CERT. This prevents the Windows behaviour beeing changed by an autorun.inf file but the selection dialog is still working.
Another setting for CDROM drives is the value "AutoRun" under HKLM\SYSTEM\CurrentControlSet\Services\Cdrom. Despite the name it controls the 'Auto Insert Notification', also called 'Media Change Notification (MCN)'. When deactivated media changes are not detected, therefore AutoRun does not work. But this is a side effect only. This should stay activated. Microsoft says "Do not disable the MCN message unless you have no alternative". One reason to deactivate this is a cyclic flashing HDD-LED which happens on some computers with MCN enabled.
For changing system global settings administrator previleges are required. So under Vista and Windows 7/8 you have to right click AutoRunSettings in the Explorer and select "Start as administrator" or create a link to it with this setting.
Screenshot (AutoRun completely deactivated):
Screenshot XP defaults
Download: autorunsettings.zip
Last update: 27 August 2010
|
|
| |
|
| |
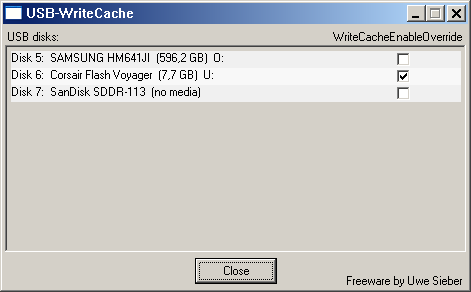
USB-WriteCache V0.1 |
My means of USB-WriteCache you can force the activation of a write-cache for USB drives.
It reads/writes the registry value WriteCacheEnableOverride under HKLM\SYSTEM\CurrentControlSet\Enum\(DeviceInstanceID)\Device Parameters\Classpnp.
For making a setting it needs admin previleges, otherwise you get an "Access is denied".
New settings take effect after the drive is re-attached or the system is restarted.
Screenshot:
Download: usb-writecache.zip
Last update: 12.2.2010
|
|
| |
|
| |
Misc |
To work effective on the Windows Console I suggest FAR - the
File and Archive Manager. It's a Norton Commander clone for the Win32 Console.
And my Console fonts to get an authentic DOS look :-)
|
|
| |
|
Counter since Feb. 1998

last change: 08 August 2012
Uwe Sieber
Home: http://www.uwe-sieber.de/english.html
|